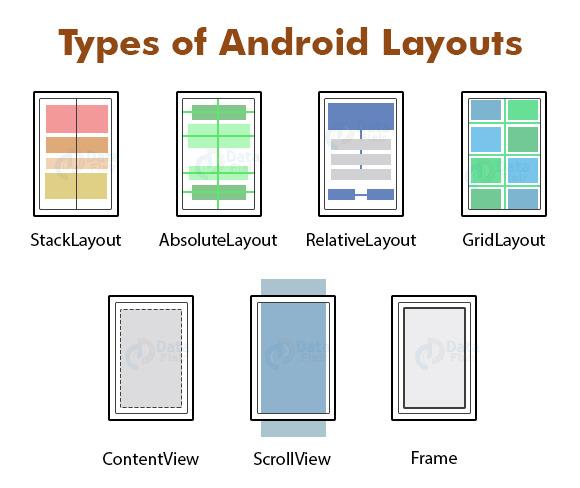
이번 글에서는 안드로이드의 레이아웃과 그 속성에 대해 이야기해보고자 한다.
먼저 레이아웃의 종류에 대해 알아보자.

위의 사진에서 볼 수 있듯이 레이아웃은 StackLayout, AbsolteLayout,
RelativeLayout, GridLayout, ContentView, ScrollView, Frame 총 7개의 종류로 나눌 수 있다.
이렇게 나누는 사람도 있고,
- Linear Layout
- Relative Layout
- Constraint Layout
- Table Layout
- Frame Layout
- List View
- Grid View
- Absolute Layout
- WebView
- ScrollView
위와 같이 종류를 나누는 사람도 있다.
어떻게 종류를 나눠도 상관은 없다.
이제 레이아웃의 속성에 대해 알아보자.
TextView
안드로이드 UI를 구성함에 있어서 화면에 텍스트를 표시하는 기능을 담당하며,
안드로이드에서 제공하는 위젯 중 가장 많이 사용되는 위젯이다.
스타일, 크기, 색상 등을 변경할 수 있다.
<TextView
    android:id="@+id/textView"
    android:layout_width="wrap_content"
    android:layout_height="wrap_content"
    android:text="Hello, World!"
    android:textSize="16sp"
    android:textColor="@android:color/black"/>
Button
TextView가 Button의 부모 위젯이다.
이름에서 알 수 있듯이 버튼이니까, 클릭이 가능하다.
onClickListener를 통해 이벤트 처리가 가능하다.
<Button
    android:id="@+id/button"
    android:layout_width="wrap_content"
    android:layout_height="wrap_content"
    android:text="Click Me"/>
button.setOnClickListener {
Toast.makeText(this, "Button Clicked", Toast.LENGTH_SHORT).show()
}
ImageView
이미지를 표시하는 위젯이다.
<ImageView
    android:id="@+id/imageView"
    android:layout_width="wrap_content"
    android:layout_height="wrap_content"
    android:src="@drawable/sample_image"/>
RecyclerView
많은 양의 데이터를 효율적으로 ‘리스트’ 형태로 표시하는 위젯이다.
Adapter, ViewHolder 패턴을 사용해야 한다.
<androidx.recyclerview.widget.RecyclerView
    android:id="@+id/recyclerView"
    android:layout_width="match_parent"
    android:layout_height="match_parent"/>
class MyAdapter(private val items: List<String>) : RecyclerView.Adapter<MyAdapter.ViewHolder>() {
class ViewHolder(itemView: View) : RecyclerView.ViewHolder(itemView) {
val textView: TextView = itemView.findViewById(R.id.textView)
}
override fun onCreateViewHolder(parent: ViewGroup, viewType: Int): ViewHolder {
val view = LayoutInflater.from(parent.context).inflate(R.layout.item_layout, parent, false)
return ViewHolder(view)
}
override fun onBindViewHolder(holder: ViewHolder, position: Int) {
holder.textView.text = items[position]
}
override fun getItemCount() = items.size
}
ScrollView
콘텐츠가 화면을 넘어갈 경우 스크롤 가능하게 만드는 레이아웃이다.
ScrollView 내부에는 하나의 ViewGroup만 포함해야 한다.
<ScrollView
    android:layout_width="match_parent"
    android:layout_height="match_parent">

    <LinearLayout
        android:layout_width="match_parent"
        android:layout_height="wrap_content"
        android:orientation="vertical">

        <TextView
            android:layout_width="match_parent"
            android:layout_height="wrap_content"
            android:text="Scrollable Content"/>

    </LinearLayout>
</ScrollView>
NestedScrollView
위에서 설명한 ScrollView의 확장 버전이다.
RecyclerView와 같은 스크롤 가능한 뷰와 함께 사용할 때 유용하다.
<androidx.core.widget.NestedScrollView
    android:layout_width="match_parent"
    android:layout_height="match_parent">

    <LinearLayout
        android:layout_width="match_parent"
        android:layout_height="wrap_content"
        android:orientation="vertical">

        <TextView
            android:layout_width="match_parent"
            android:layout_height="wrap_content"
            android:text="Nested ScrollView Content"/>

    </LinearLayout>
</androidx.core.widget.NestedScrollView>
ButtomNavigationView
화면 하단에 고정된 네비게이션 바를 제공하는 UI 컴포넌트이다.
<com.google.android.material.bottomnavigation.BottomNavigationView
    android:id="@+id/bottomNavigationView"
    android:layout_width="match_parent"
    android:layout_height="wrap_content"
    android:layout_gravity="bottom"
    app:menu="@menu/bottom_nav_menu"/>
<!-- res/menu/bottom_nav_menu.xml -->
<menu xmlns:android="http://schemas.android.com/apk/res/android">
<item android:id="@+id/home"
android:title="Home"
android:icon="@drawable/ic_home"/>
<item android:id="@+id/profile"
android:title="Profile"
android:icon="@drawable/ic_profile"/>
</menu>
TabLayout
여러 개의 탭을 제공하는 UI 컴포넌트이다.
<com.google.android.material.tabs.TabLayout
    android:id="@+id/tabLayout"
    android:layout_width="match_parent"
    android:layout_height="wrap_content"/>
val tabLayout = findViewById<TabLayout>(R.id.tabLayout)
tabLayout.addTab(tabLayout.newTab().setText("Tab 1"))
tabLayout.addTab(tabLayout.newTab().setText("Tab 2"))
FloatingActionButton
둥근 모양의 버튼으로 액션을 강조할 때 사용된다.
<com.google.android.material.floatingactionbutton.FloatingActionButton
    android:id="@+id/fab"
    android:layout_width="wrap_content"
    android:layout_height="wrap_content"
    android:src="@drawable/ic_add"
    app:layout_anchor="@id/recyclerView"
    app:layout_anchorGravity="bottom|end"/>
margin
뷰의 외부 여백을 설정하는 속성이다.
<TextView
    android:layout_width="wrap_content"
    android:layout_height="wrap_content"
    android:text="Hello"
    android:layout_margin="16dp"/>
padding
뷰의 내부 여백을 설정하는 속성이다.
<TextView
    android:layout_width="wrap_content"
    android:layout_height="wrap_content"
    android:text="Hello"
    android:padding="16dp"/>
ChainStyle
ConstraintLayout 에서 뷰들을 하나의 체인으로 묶어 정렬하는 속성이다.
<androidx.constraintlayout.widget.ConstraintLayout
    android:layout_width="match_parent"
    android:layout_height="match_parent">

    <TextView
        android:id="@+id/text1"
        android:layout_width="wrap_content"
        android:layout_height="wrap_content"
        android:text="Item 1"
        app:layout_constraintStart_toStartOf="parent"
        app:layout_constraintEnd_toStartOf="@id/text2"/>

    <TextView
        android:id="@+id/text2"
        android:layout_width="wrap_content"
        android:layout_height="wrap_content"
        android:text="Item 2"
        app:layout_constraintStart_toEndOf="@id/text1"
        app:layout_constraintEnd_toEndOf="parent"/>

    <androidx.constraintlayout.widget.ConstraintSet>
        <Constraint
            app:layout_constraintHorizontal_chainStyle="packed"/>
    </androidx.constraintlayout.widget.ConstraintSet>

</androidx.constraintlayout.widget.ConstraintLayout>
id 네이밍
뷰의 ID를 설정할 때 일관된 네이밍 규칙을 따르는 것이 중요하다.
일반적인 네이밍 규칙은 아래와 같다.
- tv_ → TextView
- btn_ → Button
- img_ → ImageView
- rv_ → RecyclerView
- fab_ → FloatingActionButton
<TextView
    android:id="@+id/tv_title"
    android:layout_width="wrap_content"
    android:layout_height="wrap_content"
android:text="Title"/>'Android' 카테고리의 다른 글
| [Android/Kotlin] Activity와 AppCompatActivity (2) | 2025.03.25 |
|---|---|
| [Android] 안드로이드 매니페스트(Manifest)란? (0) | 2025.03.18 |
| [Android] 안드로이드 아키텍처(Architecture) 권장사항 (2) | 2025.03.17 |


